We got here to Wawaloam Campground in West Kingston, RI yesterday and have a reservation for 3 nights scheduled to leave on Sunday. Hurricane Henri is headed straight for us so we will be leaving in the morning and moving 100 miles west into Connecticut. We have been here before and visited Newport where all the mansions are but have never camped in Rhode Island. We have now so can officially count this state.
Friday, August 20, 2021

Newton, NJ
Those of us from down south have a tendency to think big city when we hear the words New Jersey or New York but nothing could be further from the truth. Sure there are densely populated areas of both those states but there are more rural and farming areas than crowded cites. Newton is the county seat of Sussex County and a very old township. Sussex County claims to be the greenest county in New Jersey and looking around the country side seems to support that claim. We noticed many fields of tall, healthy looking corn and even sunflowers. When we think of sunflowers we think of North Dakota but here we are in New Jersey with fields of sunflowers. There are farms and gardens at every turn and we have seen numerous road side stands selling local vegetables. The topography is very hilly and reminds us of East Tennessee.

Welcome sign

Sunflowers near the welcome sign
At the center of downtown Newton is a square that has been there since 1762 and was originally the courthouse yard. It was used for political meetings, corporal punishment, militia training, public entertainment, and a common pasture. Until 1858 voters in township elections indicated their choice by moving either up or downhill on the green for a head count. North bound traffic passing thru Newton navigates the downhill side of the square and South bound traffic the uphill side.

Looking downhill at the square across the path for South bound traffic

Facing South bound traffic traveling uphill

North bound traffic traveling downhill

Looking downhill inside the square

Monument inside the square

Presbyterian church above square
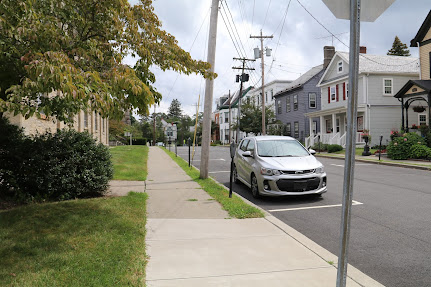
Us parked beside the Presbyterian church

Typical houses near the square

House behind the church

Old mansion now used as a rest home
Wednesday, August 18, 2021
Our first trip in the Quantum JM31
We are on our first trip with the Quantum JM31 and left home on Saturday. We planned this trip after ordering the JM31 in January and were hoping we would be in the new coach by August because some of our campground choices were based on having the smaller rig. As we write this we are at The Great Divide Campground in Western New Jersey. This is a 100 acre campground with narrow, winding, and hilly roads in rural New Jersey and walking in the campground this morning we saw six deer. We have not seen any diesel pushers in the campground and sure glad we don't have to maneuver one here. This is our first stop for more than one night and was chosen so we could claim we have camped in New Jersey. We had originally planned to cross the Chesapeake Bay Bridge and camp on the shore of Delaware and then take the ferry over to New Jersey and camp on the coast there. After that we would need to move further West to continue out trip to Maine. We happened across this campground in West New Jersey and decided to stop here and camp in Delaware on a future trip. It may seem like a silly goal but we are trying to check off the remaining states that we have not camped in. Once we finish this trip we will have camped in 48 of the 50 states with Hawaii and Delaware not accomplished. Of course Hawaii may not happen but we do have a niece who lives there on a farm and could fly there and camp in her back yard with a tent.
Traveling is significantly more pleasant and less stressful with the JM31 compared to our previous 41 foot diesel pusher. The JM31 handles and rides nicely and there is very little if any affect from passing 18 wheelers. We know it may sound strange to hear the JM31 rides better than our diesel pusher but it does. The diesel pusher was a 2006 model with a straight front axle that banged harshly on rough roads and bridges. We worked for many years and spent significant funds trying to improve the ride with only marginal success. We do miss the Quiet Diesel generator and the torque of the ISL400 Cummins. There is also more wind noise in the Class C than in the Class A and of course getting in and out of the seats is more challenging in the Class C. But we knew that would be the case going in. What we don't miss is that large windshield that would pour heat into the coach and the lousy dash air conditioner with the 40 foot lines back to the compressor. On this new Ford the dash air will freeze you to death and we find ourselves turning it way back as we drive. On the Class A we had to always run the generator in the summer as we drove to keep the coach cool. The Class C cools down fast and we find ourselves driving more with the roof AC's off. Another thing we don't miss on the Class A are the electric steps that were always giving trouble. The Class C is low to the ground and only needs the two built in steps at the door.
We have already made some improvements to the JM31 but as we use it we discover more things we need to do. For one the water pressure is terrible no matter how good the campground feed is and the water pump has poor pressure. Also the kitchen sink drains very slow. We plan to delve into these when we get back home.
Monday, July 19, 2021
Auxiliary power for air conditioners
Unless you have a high dollar diesel pusher with a litany of electrical appliances and air conditioners, a 30 amp shore
power connection is adequate with the exception of running air conditioners. When we ordered our Quantum JM31 we added the optional two air
conditioners and energy management system because years of experience using
an RV in hot weather has educated us. This option deletes the 15K BTU air conditioner
in the front and replaces it with an 11K BTU unit and adds a second 11K BTU
unit in the rear. The energy management system monitors the overall current
draw from either the shore power connection or the generator and sheds
the rear air conditioner if the current exceeds 30 amps. The front air conditioner
can be shed if the current demand again exceeds 30 amps while the rear unit is
shed. The majority of the time we are at a campsite with a 50 amp connection and when the weather is hot would prefer not to shed either
unit when the wife is using the washer/dryer, the microwave, or the induction
cooktop.
We thought about how to modify the electrical system to power the air conditioners from a second leg of the 50 amp pedestal connection without affecting the standalone 30 amp system. The following block diagram shows what we came up with. Because all the power to the motorhome would need to be off while making the connections, we did not want to make this modification until we had everything on hand and could do it in one day. So this has been an ongoing project for over a month ordering parts and making mods that did not require the power to be turned off. The modification is now complete and we are pleased with how it turned out.


Block diagram
Do not connect the bare wire safety ground on the second 30 amp power cord.
The plan was to install a second transfer switch to connect the other leg of the 50 amp pedestal defaulting it to the main 30 amp input. In that manner the coach would operate in the original configuration as long as the second 30 amp bulkhead connection was not used. To make the circuit work the way we wanted we had to install a two circuit breaker box with two 20 amp circuit breakers to serve as the breakers for the two air conditioners. The original two 20 amp circuit breakers in the power distribution center were repurposed as two 20 amp duplex outlets to be used in the winter for an electric blanket and a space heater. We were not able to find a flush mount two circuit breaker box and had to modify a surface mount version to be flush mountable. Since it was important to keep the power management system ampere monitor in the circuit when the air conditioners were operating in the normal 30 amp mode a junction box was necessary. The junction box allowed the 30 amp feed to be split between the power distribution center and the second transfer switch placing both after the ampere monitor. We were able to locate and purchase a 30 amp twist lock bulkhead socket just like the factory installed one. That made the modification aesthetically pleasing and continued the factory theme of preventing insects from entering the RV via the power cable.
All the modifications had to be confined to under the bed or the outside compartment near the shore power inlet. Space is limited with the fresh water tank and other items already installed there. Removing the panel near the shore power connection proved that area to be the best location for the transfer switch. The upper run of 10-2 Romex is coming from the junction box near the power distribution center and provides standard 30 amp power to the shore input of the transfer switch. The connection below that is the generator input of the transfer switch and is connected to the second 30 amp bulkhead socket on the exterior of the motorhome. The output of the transfer switch goes to the breaker box with the air conditioner 20 amp circuit breakers.

Second transfer switch installed near shore power input
The area around the bottom of the bed is framed and then covered with luan. There was an opening of the frame near the power distribution center that was perfect to fit the breaker box for the air conditioners. We first cut a piece of 1/2 inch plywood that would fit in between the framing and then mated the breaker box to that plywood.

Plywood frame

Attached with aluminum angle

Front view

Attaching angles with blind rivets

Fabricated new front panel from ABS plastic

Breaker box installed and wired

Panel installed over breaker box
We installed the junction box to the top frame rail near the power distribution center and used screw terminal splice connectors. We do not feel confident using push in splices or wire nuts on a 30 amp connection.


Junction box installed near power distribution center
On each side of the bed we installed a 20 amp duplex outlet fed by the original 20 amp air conditioner breakers. We re-labeled the breakers CKT #1 and CKT #2.

20 amp outlet for space heater

Re-labeled original air conditioner breakers

Second 30 amp shore power socket
When at a campsite with 50 amps we plan to use the Bulldog and a 50 amp to two 30 amp adapter for our power connection. We hooked everything up just like we were at a campsite to test things out.

Bulldog and 50 to two 30 adapter
First we ran the system with only one power cable connected to the main 30 amp shore power input and turned on both air conditioners with the thermostat set to 70 degrees to insure the compressors would run. Our garage HVAC is at 74. The Power Control System displayed a current draw of 20 amperes. Not enough to cause the rear air conditioner to shed but a clear indication the current monitor is seeing the air conditioners.

Total current used from shore power

Bluetooth monitor for Bulldog shows Line1 drawing 19.3 amps and Line2 zero
The next step was to turn off the air conditioners and connect the second leg from the Bulldog to the auxiliary 30 amp connector. We waited for the transfer delay and after hearing the switchover turned the air conditioners back on. You could hear the compressors running but the Power Monitor System was only showing 4 amperes total current draw from the main 30 amp shore connection. The total air conditioner load was removed from the standard shore connection and moved to the second leg of the 50 amp pedestal connection. If we remove the second 30 amp connection the transfer switch will place the two air conditioners back on the standard 30 amp shore power connection and the entire motorhome again operates from a single 30 connection.

Total current draw from 30 amp shore connection is 4 amps

Bluetooth monitor on Bulldog shows air conditioner load is on Line2
Friday, July 16, 2021
Second generator switch, new seat belt, install Kilmat
The Quantum is the third motorhome we have owned and the
first two had a switch to start and stop the generator from the driver’s seat
in addition to the switch located near the middle of the coach. We almost never
used the switch in the middle of the coach and would often start the travel day
with the generator off and then start it as we traveled down the road. After a
few days using the Quantum we knew we were going to install a second switch
near the driver. We already had a SPDT momentary switch in our stock of
switches and plenty of black ABS sheet to make our own remote start generator
switch. This was a no brainer when you considered most sources were asking $50
for a remote generator switch. After fabricating the switch we scoped out the
best location for the switch and a convenient route for the wiring from the
generator to the dash. The best location for the switch was to the right of the
steering column on the same panel the emergency start switch is located.
Removing the kick panel at the bottom of the door frame revealed a cable tray
and a spare hole the wire could be routed thru to the generator. We enclosed
the three wires necessary in split loom and the spare hole was large enough for
the split loom to slide thru. After
locating a wiring diagram for the generator we knew which wires at the remote
start connector to splice into. We used 16 gauge wire and blue quick splice
connectors. At the other end we crimped push connectors to the wires and
connected them to the switch. We had previously noted which posts on the switch
to use for the three wires so the start and stop labels would be correct.
We had a defective driver’s seat belt and Thor had sent us a new one. It simplified the task of installing the seat belt if the driver’s seat was removed plus the same kick panel at the bottom of the door frame needed to be removed. We decided to combine the two projects of installing a second generator switch and the new seat belt. If we were going to go this far it made sense to go ahead and remove both seats, the dog house, and the floor mat and install Kilmat at the same time. So we did all three projects at the same time. Unfortunately we forgot to take a photo of the Kilmat installation.

Generator Switch

Route for wires from generator

Seats, dog house, and floor mat removed
Monday, July 5, 2021
Installed SeeLeveL II 709-BTP3
We like to be able to read the tank levels from the service bay as well as inside the coach. We have installed the SeeLevel tank gauges on two previous RV's and like them. They are more accurate than the 1/3, 2/3, Full type gauges that came with the motorhome plus the sensors are on the outside of the tank so we don't have to worry about foreign matter clinging to the sensor and causing a false reading. We opted for the Garnet 709 series with Bluetooth so we can also read the SeeLevel gauges from inside the motorhome using our phone.

SeeLeveL display in the service bay

Sensor on the fresh water tank under the bed. The black and gray are in a tight spot and difficult to take a photo of.

Screen shot of the app on the phone
Thursday, July 1, 2021
Dealing with the bifold mattress
We no longer need this strap. The strap was necessary because the bed would not fold since we had two toppers on the mattress. Yes, two toppers. The first night we camped after picking the unit up from the dealer was an eye opener. The mattress was like sleeping on a hard floor and the wife had us off to Walmart the next day to purchase a topper. She still was not a happy camper and we ordered a better topper from Amazon when we got home. They were both on the mattress and the wife was still not happy. Besides not providing a good night's sleep the bed was very difficult to make. We decided to have a new custom mattress made and instructed them to make it two inches narrower. The difference is amazing and the mattress flips over and lays flat just like the original when it is time to bring in the slide. The bed is also easy to make now. Happy Wife, Happy Life and yes it cost me a bundle.
The bifold mattress in the JM31 is like sleeping on concrete so we added a topper to soften the experience. The half of the mattress at the foot must be folded up when the slide is brought in. After adding the mattress topper when we folded it up it did not want to stay and would fall back down. We made an adjustable and removeable tie back strap using marine fender locks and the straps from some inexpensive May West life vests.


Subscribe to:
Posts (Atom)
First Baptist Church of Amherst, Nova Scotia
This will be the final post to this blog for this trip. We are headed home. Marine Atlantic ferries to and from Newfoundland cross either a...

-
 When we got the call that our motorhome had arrived at the dealership in Florida we started looking for a washer/dryer to install. With al...
 -
 We were very displeased with the performance of the omni directional over the air television antenna located inside the Winegard Connect 2...
 -
 Bath Maine is on the Kennebec River and is known for ship building. During World War II the Bath Iron Works launched a ship about every 17 d...